The violin is tuned by adjusting the pegs at the top of the instrument or the fine tuners (if installed) at the tailpiece. The most common method for beginners is to find the desired pitches on a piano, tuning fork, pitch pipe, or other source, and to adjust the pitch of the strings to match. The student plucks the strings while tuning and uses the fine tuners at the tailpiece. Advanced players bow the strings while adjusting the pegs with the left hand. This type of "bowed" tuning is much more accurate, resulting in exact intervals of a perfect fifth between strings, which in turn results in a beautiful sounding instrument.
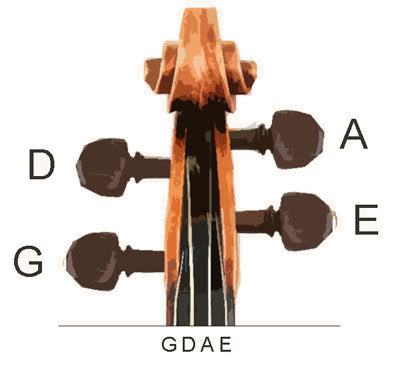
The strings of the violin are usually tuned in perfect fifths. From lowest to highest, the pitches are: G3, D4, A4, and E5. Alternate tunings are sometimes used - particularly in Bluegrass and other fiddling styles.
Standard Tuning
| E String | (E5, e'', 659.25 Hz.) | |
| A String | (A4, a', 440.00 Hz.) | |
| D String | (D4, d', 293.66 Hz.) | |
| G String | (G3, g, 196.00 Hz.) |
Using the Piano as a Reference

Using the Fine Tuners
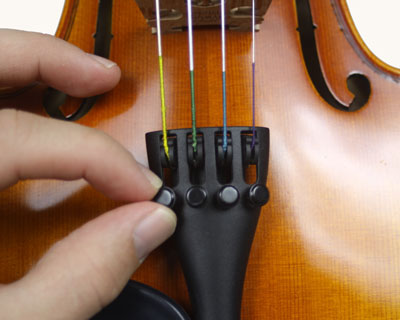
Fine tuners are a fast and easy way to make small adjustments to the tension, and therefore the pitch, of the strings. Student instruments typically have fine tuners for all four strings. Professional instruments are setup with only one fine tuner, on the E string. To adjust the pitch, simply turn the tuner dial - clockwise to raise the pitch, counter-clockwise to lower it (righty tighty, lefty loosy).
Eventually, the dial will be turned so far, in the clockwise direction, that it can no longer be tightened. When this happens, the dial must be loosened by turning counter-clockwise until the screw is high (loose) enough to be usable, and the string must be tightened using the tuning peg. Similarly, if the dial is turned too far counter-clockwise, it will fall out. If this happens, simply put it back in and turn clockwise until it once again starts to tighten the string.
Note: On some instruments, and with some tuners, the mechanism on the bottom of the fine tuner can damage the surface of the violin or cause a buzz when the tuners are made too tight (when they are close to their clockwise limit). To check, simply look under the tuners and see how much clearance there is between them and the violin.
Using the Tuning Pegs
Tuning with the pegs can seem daunting, at first. But, it is a necessary skill for any player and not all that difficult to master. Briefly, here are the steps to follow when tuning the G or D strings . . .

- Find the desired pitch, using a tuning fork, pitch pipe, or piano.
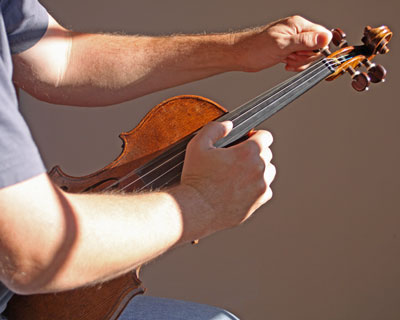
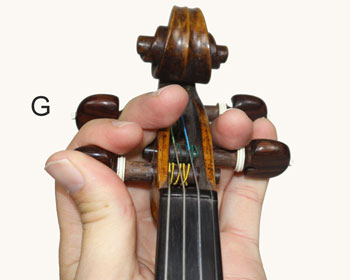
- Place the violin upright on your lap (see photo).
- Grip the peg between your left thumb and index finger.
- With your right hand, hold the violin firmly at the base of the neck.
- Lower the tension of the string by turning the peg clockwise approx. 1/4 turn, or so. Note: the peg will naturally loosen as you turn, so don't let go until you have tightened it again (below).
- With your right thumb, start plucking the string repeatedly, several times each second. In this way, you'll always know how close you are to the desired pitch, and you can avoid over-tightening the string.
- While continuing to pluck with your right thumb, hold the neck of the violin firmly with your right hand. In a moment you'll be pushing the peg into the peg-box, and your right hand will need to hold the instrument steady, against this pressure.
- Turn the peg counter-clockwise while simultaneously pushing the peg into the peg-box. If done correctly, you'll feel the peg tighten in the peg hole as you do this. Stop turning when you hear the desired pitch. (Remember, you should be plucking with your right thumb.) This must be done in one smooth motion.
- If, after letting go of the peg, you find that the pitch of the string is not correct - either too flat or too sharp - then loosen the peg, turning clockwise, and try again. Even professional players often have to try several times before they are happy with the result. With practice, this will become quick and easy. If you have fine tuners installed on your strings, then you only need to get close with the peg - the fine tuner will do the rest.
- If, after letting go of the peg, it spins in the peg hole and the string loses all tension, then you did not push it into the pegbox firmly enough as you were turning. Tighten the string by turning the peg counter-clockwise and try again with a little more force.
To tune the A and E strings, follow the same guidelines. But, note that these pegs turn in the opposite direction - clockwise to tighten the strings and counter-clockwise to loosen them. A few other tips to keep in mind . . .
- If your pegs are cranky, difficult to turn, or constantly slipping, they need to be lubricated. (This should be done with every changing of the strings.) We recommend Hill peg compound. Unfortunately, to apply it, you'll need to remove the strings from the pegs, one at a time. For instructions on proper string installation, see our String Installation Guide.
- If your pegs are still cranky after lubrication, then you may have a bigger problem. Take you violin to a shop to have the pegs checked. If the pegs or holes have become worn or warped, or if the pegs were never fitted properly, you'll want to get this corrected.
- Always be extremely careful not to over-tighten the strings (making the pitch too high). This is a common cause of string breakage, and, good strings are expensive!
- Avoid the use of peg drops, which cause both the peg and pegbox to swell, temporarily. If you're having a problem with slipping pegs, lubricate them with peg compound or see a professional.
Tuning with the Bow
Advanced players are expected to tune their violins with the left hand, while bowing with the right. The A string is tuned first, to a pitch fork, piano, or other reference. (In the symphony hall, the entire orchestra will tune to a concert A, played by the oboe.) Once the A string is matched to the reference note, the D string is tuned to a perfect fifth below the A. Then, the G is tuned in similar fashion to the D. And, finally, the E string is tuned to a perfect fifth above the A. This system of tuning is also called relative tuning.
There are a number of reasons for this. First, it is the only practical way for a large group of musicians, with different instruments, to quickly get in tune with each other. The oboe can't be expected to give reference notes for each and every string that needs to be tuned - never mind the brass and woodwind sections. Second, by bowing two strings together, rather than plucking, the trained ear can match the pitches with much greater precision. It's also faster to tune the pegs with the left hand, and professional instruments do not have fine tuners installed for the G, D, or A strings - they weigh down the tailpiece, adversely effecting the tone.
To begin with, you should verify that your pegs are well lubricated and installed correctly. If they do not turn easily, or if they slip easily, relative tuning will be difficult. (We recommend Hill Peg Compound.) The pegs must also be arranged so that the peg heads can easily be grasped by the left hand. This is accomplished by adjusting the strings during installation. By pushing the string through the hole in the peg a few mm more or less, before winding the string onto the peg, the final angle of the peg head can be controlled. This may need to be re-adjusted as the strings stretch.
- Find a reference A, using a tuning fork, pitch pipe, or piano.
- Hold the violin in playing position.
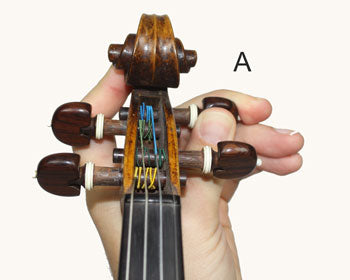
- Grip the A string peg as shown (see photo, below). Use your thumb and middle finger to grip the peg head, while supporting the opposite side of the pegbox with your index finger.
- Bow the A string with a long, smooth, light bow stroke - down and up, down and up with no stopping.
- Lower the tension of the A string by turning the peg 1/4 turn, or so.
- Then, bring the string back up to pitch while simultaneously pushing the peg into the pegbox with your fingers. Use the thumb and middle fingers to turn and push the peg into the pegbox, while supporting the pegbox with you index finger (giving the thumb and middle finger something to push against). If done correctly, you'll feel the peg tighten in the peg hole as you do this. Stop turning when you reach the desired pitch. This must be done in one smooth motion.
- If, after letting go of the peg, you find that the pitch of the string is not correct - either too flat or too sharp - then loosen the peg and try again. Even professional players often have to try several times before they are happy with the result. With practice, this will become quick and easy.
- If, after letting go of the peg, it spins in the peg hole and the string loses all tension, then you did not push it into the pegbox firmly enough as you were turning. Tighten the string and try again with a little more force.
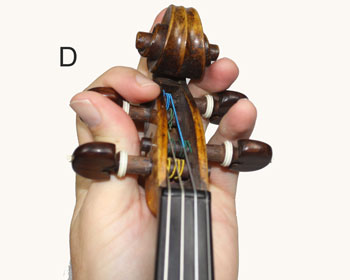
- With the A string in tune, it is time to move on to the D string. Grip the D peg using your thumb and index finger, while supporting the opposite side of the pegbox with your ring finger.
- Begin by getting the D string close to the desired pitch, tuning roughly. If you are unsure of what the desired pitch should be, use a piano of other reference, but after some practice, you'll find that this isn't necessary.
- Bow both D and A strings simultaneously, in a long, smooth, continuous bow stroke. It is important to keep a light bow stroke, as too much pressure will bend the strings and distort the pitch. And, it is important to keep the bow strokes even and smooth, so that you can listen to the interaction of the vibrations from the D and A strings.
- Listen to the combined tone (D and A) that is produced. When the two strings are perfectly in tune, at an interval of a perfect fifth, the combined tone will produce almost no dissonance and the sound will be smooth. However, if the D string is a little sharp of flat, the discerning ear will hear a fluctuation in the sound - a dissonance - a sort of "wawawawawa" sound. As you adjust the tension on the string, getting the D string closer to the correct pitch, the "wawawawa"s will slow. Then, suddenly, you'll reach the perfect pitch and the "wawawawa" sound will stop altogether, leaving a crystal clear tone.
- Tune the G string, in the same fashion, to a perfect fifth below the D.
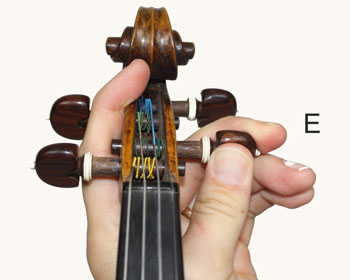
- For the E string, you may grip the peg in the same way as the A, with the index finger placed between the G and D strings. But, it is often easier to reach your left hand under the bow and adjust the E string using the fine tuner.
- Finally, after tuning all four strings, re-check the tuning of the A against your reference pitch, and the perfect fifths between each of the strings. The process of tuning each string changes the tension on the instrument (and consequently the distance from bridge to nut) and therefore pulls the other strings back out of tune. So, when you have finished, it is often necessary to start all over again, making minor adjustments to each string until the whole violin rings true.
Electronic Tuners
Although we encourage players to use their ears, and not become dependent on an electronic tuner to tell them what they're hearing, an electronic tuner can be helpful for beginners. They are also useful in noisy environments and in some performance situations. An Electronic tuner will listen to the pitch that you play and tell you whether it thinks you are in tune, too sharp, or too flat.
It can be confusing if a string is very out of tune, since the tuner may think that you are tuning to a different note than you actually are. For example, when tuning your D string, if your string is a full semi-tone flat, a chromatic tuner will say that you are in perfect tune. (It assumes that you are trying to tune to a C#.) This often puzzles young players, extremely. Note: a chromatic tuner is one that will tune to any note, and is not limited to just the notes of a particular instrument.
Some tuners have optional modes that the user can select to help address this issue. A violin mode, for example, would limit the possible notes to g3, d4, a4, or e5, the open strings of the violin. Some tuners also allow you to select the note you are tuning with a switch, which eliminates this type of confusion.
In order to function, a tuner must be able to hear the note that you play. This is accomplished either by the use of a small built-in microphone or a clip-on pickup that translates the vibrations of the instrument directly. Microphones work well in a quiet location, but are useless in a crowded and noisy room. However, pickups can be inconvenient since they must be wired to the tuner, and the standard clip, originally designed for a guitar headstock, does not clip easily to anywhere on a violin. Fortunately, there are now some pickup tuners with clips designed specifically for the violin. The nicest have the tuner built right into the pickup, so you can clip it on and go, with no wires to get tangled.
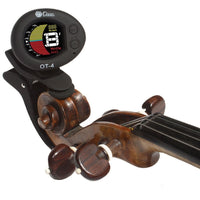 Oasis Electronic Tuner for Violin/Viola with Scroll Clip
Alternate Tunings
Although the standard G-D-A-E tuning, given above, is recommended for most players, alternate tunings are commonly used by fiddlers to allow for additional shuffling, and droning possibilities that simply can't be accomplished with the standard tuning. Tunings are typical identified by the pitches of the four strings, from lowest to highest, as in G-D-A-E for the standard tuning. Here are a few of the most common alternate tunings. . . .
- G-D-G-D - Sawmill (Lower the E and A strings) - Key of G Major
- G-D-G-B - Open G (Lower the E and A strings) - Key of G Major
- A-D-A-E - Old-Timey D (Raise the G string) - Key of D Major
- A-E-A-E - Open A (Raise the G and D string) - Key of A Major