If you've never changed violin strings before, find a professional to walk you through the process. Ask your teacher, or the people at your local string shop. They can show you how it's done, and, at the same time, check your fiddle for any problems that could make installing new strings difficult. Later, when you try it on your own, these instructions can serve as a reminder, and will help you get the best out of your new strings while keeping your fiddle safe and happy.
Is Your Instrument In Good Shape?
If your fiddle is in good working order, changing the strings will be easy. However, warped pegs, warped peg boxes (from sitting in the attic), peg holes drilled too small, too big, or very, very frequently in the wrong places, etc. can cause real problems for professionals and amateurs alike. If you run into problems, get some help.
Selecting Strings
Check out our Guide to Violin Strings or our Guide to Viola Strings for assistance in selecting the best type of strings for your instrument. Here, I'll just note that if you are switching from steel strings to synthetic or gut, be sure to check the grooves in the nut, where the strings come out of the peg-box. Synthetic and gut strings are both wider and more fragile than steel. If the grooves have any sharp edges or are too narrow, you can easily strip the winding from your new strings as they pass over the nut.
Before we begin, I'll also just note that any major change in string tension, i.e. change in gauge or switching from a low tension set like Passione to a high tension set like Evah Pirazzi, may necessitate a professional adjustment of your soundpost.
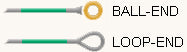
Lastly, be sure to select the appropriate type of E string (A on viola) for your fine tuner. The lower three strings will always have a ball end. But, some E string fine tuners are designed only to accept a loop end string.
One String at a Time
Change strings one at a time. Removing all strings at once could cause your soundpost to drop, and makes it harder to keep your bridge set in the right place.
1. Remove the Old String
Loosen and unwind the tuning peg and remove the string. Then, remove the string from the fine-tuner or tailpiece. Be careful not to scratch the varnish; string ends can be sharp.
2. Lubricate Tuning Peg

|
|---|
| Hill Peg Compound |
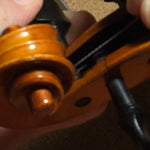
Remove the peg from the peg box. Lubricate the worn surface of the peg (the shiny rings on the shaft of the peg, where the peg touches the pegbox) with Hill Peg Compound. If you don't have this on hand, you can use the traditional method of applying a layer of standard blackboard chalk, followed by a layer of soap (regular bar soap), although this is not always as effective. Avoid the use of peg drops, except in the most severe circumstances. They work by causing the wood to swell, temporarily; use too much, and you'll have a very tightly stuck peg and/
or a cracked pegbox. The best solution for a peg that won't hold is to have a professional examine it and, if necessary, re-shape the peg and hole.
Replace the peg and turn it back and forth a bit, to work in the lubrication. Note: Don't mix up the pegs. They are not interchangeable!
Note: If you violin has geared pegs, lubrication will not be possible or necessary.
3. Lubricate Nut & Bridge
Use a sharp pencil to lubricate the bridge and nut where the string makes contact. The goal is to allow the string to pass easily over the nut and bridge as it is tuned up to pitch. If using an E string with a bridge protector (little piece of plastic that slides up and down the string) then you don't need lubricate the bridge under the E.
4. Thread String Into Peg
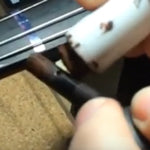
Visually locate the string hole drilled in the peg. (Be sure you have the correct peg and you're not installing the D string on the G peg, for example.) You'll want to install the strings in the correct location, relative to each other. If installing a G, for example, be sure you're installing it to the left of the D string. Depending on the location of the hole in the peg, you may need to loosen the peg and move it out slightly in order to align the whole with the correct location relative to the other strings, before inserting the string you're installing. (Otherwise, you may end up with strings crossing over each other within the pegbox, which simply won't work.) Thread the end of the string through the peg-hole so that a small amount (approximately 1-2 mm) sticks out the other side of the peg.
5. Wind the String
Start winding the string onto the peg. Wind the left pegs (G and D on violin, C and G on viola) counter-clockwise and the right pegs (A and E on violin, D and A on viola) clockwise. Wind the first loop of the string toward the pointy end of the peg, then cross over the first loop and wind the rest toward the opposite end of the peg. Winding over the first loop in this way will "tie" or "lock" the string onto the peg and help keep the string from slipping. Keep winding away from the pointy end of the peg, making a neat row of coils, until the string is the correct length. When finished, you want the string to come just to the edge of the pegbox. If the string is crushed up against the edge, unwind it and try again. (If the string rubs against the pegbox when the peg turns, the peg will constantly push itself loose, the string will be difficult to keep in tune, and the friction may even cause the string to break.)
6. Attach to Tailpiece

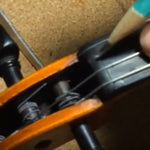
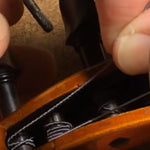
Run the string between your thumb and index finger, removing any twist in the string, and attach the ball/loop end to the tailpiece or fine-tuner. Some players, before attaching the string to the tailpiece, will gently bend the string as they run it between thumb and index finger, in order to pre-stretch the core and help the string settle more quickly. Although, this is preferable to the more common method of stretching the string by pulling on it after installation (which can damage the string), for amateurs, we recommend letting the string stretch and settle naturally on its own.
7. Remove Slack
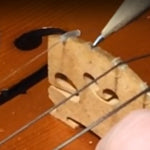
Place the string carefully in the appropriate slot of the nut and bridge. Check to see that the string is running directly from the peg to the nut to the bridge to the tailpiece, not twisted with another string or wrapped around anything it shouldn't be. Wind the peg to remove the slack, and place a small amount of tension on the string. If the string has a bridge protector (small piece of plastic that slides up and down the string), be sure to slide it into place on top of the bridge. Most E strings have a bridge protector and if it is left off the bridge, it will buzz as the violin is played.
8. Check Bridge
Check that the bridge is straight. The back of the bridge (the side facing the tailpiece) should be exactly perpendicular to the surface of the violin, and the feet of the bridge should be flat on the surface of the instrument. If the feet are flat, but the bridge is not straight, you have a warped bridge and should have it replaced by a professional. (This is extremely common, and should be expected if you don't routinely check your bridge for straightness.)
9. Bring Up To Pitch
Loosen all fine tuners (in the tailpiece) until they are almost as loose as they will go, but not completely loose. Use a piano, tuning fork, pitch pipe, or electronic tuner to check the desired pitch of the string. Tighten the string, using the tuning peg, gradually, until you reach the desired pitch. Periodically check that the bridge remains straight as you do this, and do not tighten the string beyond the desired pitch! For more on tuning your violin, see How To Tune A Violin.
Incidentally, this is also a good time to loosen those fine tuners. Whether you have just one on the E string, or one on each string, just loosen them up so that they have plenty of room for tightening, as the strings stretch. Note: If you loosen them too much, the screw will fall out. No worries - just put it back in again and tighten until it engages in the threaded hole. Also: be careful - some fine tuners will scratch the surface of the violin if turned too tight! If your fine tuners do not turn easily, this is also a good time to remove the screw and lubricate with a little bar soap or hinge grease.
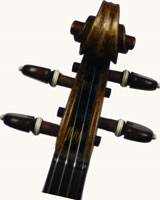
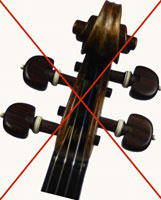
10. Adjust Peg Angles
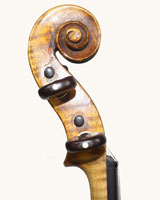
Many players tune their violins left-handed, while bowing the strings. Those who rely primarily on the fine-tuners can safely skip this step. To allow the player's fingers to easily slip between and grip the pegs, the angle of each peg-head needs to be adjusted (see illustration). The angle can be altered by loosening and unwinding the peg, and allowing a bit more (a millimeter or so) or less of the string to protrude through the peg hole before winding.
New Strings Will Stretch
As the strings stretch over the next few days, you will need to continue tuning them up. Synthetic and gut strings can be difficult to keep in tune during this time. Also, the tone quality of brand new strings is often somewhat harsh until they settle in. The period between installation and the settling of the strings, called the break-in time, is longer for synthetic and gut strings than for steel. Note that the practice of pulling on the strings to speed this stretching process is not recommended and may damage the core.
A Few Notes About Gut Strings
In spite of the expense and difficulties of using gut strings, I recommend that everyone try a set at least once, to get a feel for the real thing. They have a sound and feel unlike anything synthetic - softer, richer, more textured, and with more surface sound from the fingers. Passione strings, from Pirastro, are an excellent set to try, since they are relatively stable and have the customary ball (or loop) ends. If you choose to put on a set of gut strings, here are a few things to keep in mind . . .
- Gut strings are lower in tension than steel or synthetic strings. They will, therefore, put less downward pressure on the violin and the soundpost. If you try gut strings and like them, you may choose to have your soundpost adjusted to compensate.
- Gut strings are larger in diameter and more fragile than steel strings. When switching from steel to either gut or synthetic strings, consider having your instrument checked by a professional. If the grooves of the nut are too deep or narrow, or have any sharp edges, they could easily strip the windings off the larger, more fragile gut/synthetic strings. And, at these prices, you really don't want to ruin your new strings before you even get them on your instrument! Watch closely, as you tune them up, for any pinching in the grooves, or damage to the strings as they pass over the nut.
- Some gut strings come with a looped knot, rather than a ball end. Handle the knot as you would a ball, wedging it into the tailpiece. Do not install these knotted ends as loop ends.
- Gut strings are more strongly affected by changes in temperature and humidity.
- Gut strings will need to be replaced more frequently than either steel or synthetic strings.
- Avoid purchasing plain-end gut strings, unless you are prepared to tie the required knot in the end, before installation.
Switching from Steel to Synthetic Strings
Students and their parents are frequently amazed by the difference in playability and tonality of their instruments when I install synthetic strings for the first time. They often think (incorrectly) that this transformation of their instruments is due to my skills as a craftsman. (I don't argue.) But, the plain fact is that the choice of strings makes a tremendous difference. Certainly, steel strings, particularly good quality steel strings like Prim are a great choice if you're looking for that chome-wound old-time fiddle sound. But, for most beginners, I recommend synthetic. Note that if you choose to switch from steel strings to synthetic, please note that advice, above, under A Few Notes About Gut Strings. Inexpensive student instruments are often setup specifically for steel strings, and must be adjusted before synthetic strings can be installed.
Troubleshooting
- String keeps coming out of peg hole while winding: The peg hole may be too big. If so, a smaller one must be drilled. Or, you may not be crossing the string over itself before you start to wind; see Winding the String. Or, you may not be pushing the string the whole way through the hole.
- String won't stay in tailpiece when I tighten the peg: The ball end of the string must be placed through the round hole in the tailpiece and then wedged into the little slot above the hole. You are not wedging the string into the slot properly. If the string won't go into the slot (i.e. slot is made for steel strings, but you're using synthetic) the slot must be enlarged or a new tailpiece must be installed.
- Pegs won't stay tight. They keep slipping: Be sure you are lubricating the pegs- see Lubricate Tuning Peg, above. Be sure you are pushing the peg into the hole as you turn it - see How To Tune a Violin / Using the Tuning Pegs. The peg may have been worn smooth with use. If lubrication does not help, you may need to rough the surface of the peg with fine sandpaper. One or two turns of the sandpaper is sufficient; do NOT over-sand. Note that by sanding the peg, you are making it smaller; sand too much, and the peg will no longer be usable. (In this case, a new peg must be fitted.) If, after all this, the peg still slips, and you are sure you've done everything correctly, then the peg holes may need to be re-reamed by a professional. (This is unusual.)
- The string broke when I tightened it: New strings rarely break without good reason. The most common cause is over-tightening. Be sure you are plucking the strings as you tighten them, and be sure you stop when you reach the desired pitch. Another common cause is nut grooves that are too narrow, too deep, or that have sharp edges. This is particularly true when switching from steel strings to synthetic or gut. If you are unsure, have your instrument checked by a professional.
- The strings seem to be digging into the bridge, making deep notches: Be sure you are lubricating the bridge grooves with pencil graphite when you change your strings. If your E string comes with a string protector (little piece of plastic that slides up and down the string), be sure to place it on the bridge when you install the string. To repair a damaged bridge, bridge parchments can be purchased. They should be soaked in hide glue (or other glue, if necessary) until they are soft, and then folded over the top of the bridge, covering the notch. When dry, the string can be placed on the bridge (over the parchment) in exactly the correct position, and tightened. You may need to ask a professional for help with this job.
- I installed my new strings and now there is a buzz: Any loose piece on the violin may cause a buzz. Listen carefully and look for anything that is not tightened down. The most common causes, when installing strings are a fine tuner screw not sufficiently tightened, or an e string protector left off the bridge and allowed to slide free up and down the string. If you can't find the cause, and the buzz seems to be coming from the fingerboard, and if you have switched to a lower-tension string, then the nut grooves may have worn down too close to the fingerboard. Lower tension strings and strings with a larger diameter will be more likely to buzz against the fingerboard than thinner or higher tension strings. Take your violin to a professional to have the nut adjusted or replaced.
- Fine tuners are stiff or hard to turn: Fine tuners must be lubricated periodically. Unscrew the fine tuner screw until it comes out. (Careful not to drop it!) Lubricate with soap or other lubricant. (I use Door Ease, a little lipstick size stick, available at the hardware store.) Replace and tighten the screw.
Looking to Improve Your Performance?
Nothing can replace regular and careful practice, when it comes to making beautiful music with your instrument. But, there is much to be said for having the right tools for any job. An aspiring woodworker won't succeed in making a beautiful table if given cheap or dull tools. Neither will an aspiring violinist succeed in making beautiful music - no matter how diligently he or she practices - if given a poorly setup instrument. As a bare minimum, to learn the violin, please make sure that you (or your aspiring young musician) have the following:
- A Properly Setup Violin. Much goes into a good setup. But, at a minimum, make sure that the strings are the correct height off the fingerboard and correct distance from each other. Take to a local shop for a checkup if unsure. Even a cheap instrument can be OK for a beginner, as long as the setup is done well.
- A Decent Bow. By decent, here, I mean a bow that is stiff and straight enough to allow the player to hold and handle it correctly without developing bad habits. Many, many cheap bows are twisted, warped, badly balanced, and/or so flexible (or fat and clumsy) that they can't be played properly. If you're trying to make beautiful music with a poor bow, please consider stepping up to a relatively inexpensive but well made bow such as the CodaBow Prodigy. If makes an excellent gift for young players. If you're not sure, let us send you a few bows through our In-Home Bow Trial Program, and see for yourself how much your performance improves! If you're not impressed, there's no obligation to make a purchase. Also, remember to re-hair (or clean the hair) regularly (at least yearly - six months is better).
- Get yourself some good strings! You won't believe how much difference it can make to your tone. Check out our Guide to Violin Strings for recommendations. And, remember to replace them regularly.
- Quality, Fresh Rosin. One of the least expensive and most overlooked ways of improving your performance - bowing, articulation, and tone quality - is keeping your rosin fresh. Stick with good quality rosin, and replace every time you replace your strings. Rosin still works when it gets old, but it loses its tonal quality. Fresh rosin sounds and works better. Check out some of our favorite rosins for violin.

In-Home Bow Trial Program
Three Bows - Seven Days - Professional Consultation